When playing with binary images in ImageJ, that's not really simple to remember if TRUE corresponds to white or black (specially, if you use a lot of different binary functions). Here are simple examples to try to understand how it works.
Black/White vs False/True
In ImageJ, there are four different families of operations working with binary images:
- Image Calculator with boolean operators (AND, OR, and XOR).
- Thresholding in Image > Adjust> Threshold
- Morphological operations in Process > Binary
- Image analysis in Analyze > Analyze Particles...
In boolean operators (AND, OR, XOR in Process > Image Calculator [see post]), FALSE corresponds to black pixels (pixel value of 0 ) and TRUE to white (255). In contrast, the other families (morphology and analysis) assume that a pixel value of 0 is TRUE and 255 is FALSE [see post] as shown in Fig. 1.
Note: In the literature about mathematical morphology, the objects of interest are usually defined as black pixels (value = 1) surrounded by a white background (value = 0). Thus, depending of your research field, it can be interesting to keep this behavior.
Inverting LUT
Besides the black/white differences, you must check what kind of Lookup Table (LUT) is used for your active image.
When your binary image is in inverting LUT (after a segmentation or binarization with default options), a pixel value of 0 is white and 255, black, but what about TRUE and FALSE?
As shown in Fig.2, the Image Calculator consider the black pixels (value 255) as TRUE. In this case, the LUT inversion has no effect on the boolean operators except the inverted display: 0 is still FALSE and 255, TRUE .
 |
| Fig.2: Images of Fig.1 have now an inverted LUT. The resulting image A AND B leads to the same |
In morphology and analysis, even though the pixel values remain the same (0 and 255), the TRUE and FALSE values correspond to the displayed values (black is TRUE and white is FALSE).
 |
| Fig.3: Dilation of inverting-LUT image 'A'. This is still the black pixels that are dilated regardless to its pixel values (0 or 255). |
That can be confusing !
Modifying the default mode
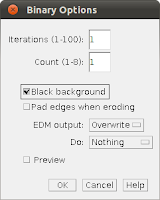
ImageJ is really powerful and of course, there's a way to tune a different behavior to get something more consistent. Go to Process > Binary > Options and check the 'Black background' (Fig. 4). Then, each time, you use a morphological operation, the white pixels correspond to TRUE and dilating a white object of interest lead to the expected result.
 |
| Fig.4: Dialog box in Process > Binary > Options. By checking the 'Black background' checkbox, the white pixels are considered as TRUE. |
 |
| Fig.5: With black background option, A) 'A' XOR 'B'. B) Erosion of 'A' XOR 'B'. C) Analyze Particles. |
In conclusion, the default behavior works fine if you don't mix boolean operators with binary operations. Otherwise, change the default behavior in Process > Binary > Options to accept a black background avoiding the use of inverting LUT.


No comments:
Post a Comment